Protege User Guide
Overview
This document walks you through how to:
- Install and Set Up Protege
- Create a Training Job Spec
- Configure Your Cloud Environment
- Launch a Training Job (single-run or sweep)
- Monitor & Debug
- Export & Use Models
1. Introduction
Protege is a suite of tools for training computer vision models using cloud resources (like GCP). You define everything in a TOML "job spec," specifying the dataset, model architecture, training parameters, and export settings. Protege then launches a pipeline to orchestrate data ingestion, model training, and final artifact export.
Key features:
- Supports multiple task types (object detection, instance segmentation, classification, keypoint detection, semantic segmentation).
- Integrates with Encord for dataset management.
- Leverages GCP for GPU training (with flexible accelerators).
- Exports models for easy consumption by
model_runtimeor third-party pipelines.
2. Installation & Setup
- Clone the
protege-mlrepository
git clone https://github.com/PlainsightAI/protege-ml.git
cd protege-ml
- Install Dependencies
Make sure you have Python 3.10+ installed. Then install the requirements:
pip install -e .
# or
pip install -r requirements.txt
(Adjust for your environment—conda, venv, etc.)
- Authentication
- If you plan to run training on GCP, ensure you have application-default credentials set:
gcloud auth application-default login
- For Encord dataset usage, you will need an Encord API key. Make sure it’s properly referenced in your environment or the job spec (if required by your internal workflow).
3. Understanding the Job Specification
Protege uses TOML files to specify training configurations. Here’s an example breakdown of a typical spec file, referencing sample_job_spec.toml:
[dataset]
source = "encord"
config.project_hash = "b1269f2e-f7e5-46c7-9ba9-39f06cbbb9ce"

[sweep]
run = false

[model]
task = "instance_segmentation"
architecture = "maskrcnn_resnet50_fpn_v2"

[training]
duration = 60
batch_size = 4
num_workers = 4
trainable_backbone_layers = 1
optimizer.type = "sgd"
optimizer.learning_rate = 0.01
augmentations.training = ""
augmentations.inference = ""
scheduler = ""

[cloud_provider]
platform = "GCP"
config.project = "alcibiades-dev"
config.location = "us-central1"
config.disk_size = 500
config.accelerator = "NVIDIA_TESLA_V100"
config.machine_type = "n1-highmem-8"

[export]
path = "gs://dummy-runs/models/model.zip"

[wandb]
project = "pipeline-sweeps-2"
Sections at a Glance
[dataset]
source: Where data originates (currentlyencord)config.project_hash: The Encord project hash
[sweep]
run: Enables sweep modenum_sweep_workers: Number of jobsepochs_per_sweep: Epochs per run
[model]
task: Task type (e.g.,instance_segmentation)architecture: Model architecture (e.g.,maskrcnn_resnet50_fpn)
[training]
duration,batch_size,num_workersoptimizer&scheduleraugmentations
[cloud_provider]
platform,config.project,config.accelerator, etc.
[export]
path: Where the final model is saved (GCS/local)
[wandb]
project: Weights & Biases project name
4. Single vs. Sweep Runs

- Single-Run: Set
[sweep].run = false. Only one training job is executed. - Sweep: Set
[sweep].run = trueand configure sweep workers and epochs.
Example:
[sweep]
run = true
num_sweep_workers = 10
epochs_per_sweep = 5
This spawns 10 parallel jobs for 5 epochs each.
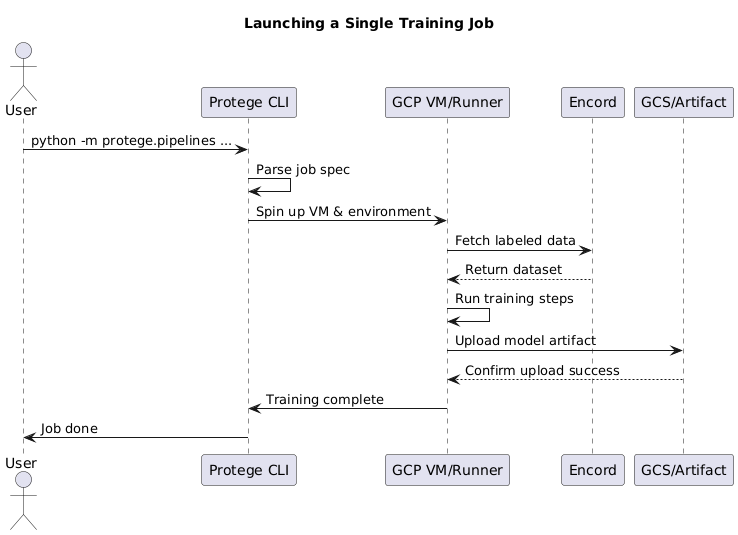
5. Launching a Training Job
With your spec ready:
python -m protege.pipelines path/to/sample_job_spec.toml [--enable_cache]
Options:
--enable_cache: Use local cache to speed up reruns
Logs will show:
- GCP instance creation
- Data pulling from Encord
- Training progress
Make sure you're authenticated with GCP and Encord.
6. Monitoring & Debugging
- Console Logs: Real-time job output
- Weights & Biases: If enabled, tracks metrics
- GCP Console: Logs for VMs or jobs
- Failure Logs: Helpful for debugging (e.g., OOM errors)
7. Exporting & Using Models
Export
Controlled by the [export].path field:
[export]
path = "gs://my-model-bucket/experiments/run1/model.zip"
The trained model will be uploaded there automatically.
Consume
from model_runtime import Runtime, Backend

runtime = Runtime("gs://my-model-bucket/experiments/run1/model.zip", backend=Backend.TORCHSCRIPT)
preds = runtime.inference([image_tensor])
Use model_runtime or your own logic to run inference.
8. Best Practices & Tips
- Try T4 GPUs first (cheaper than V100/A100)
- Lower batch size for memory errors
- Clean datasets are critical (well-labeled, diverse)
- Use W&B for metrics and visualizations
- Start small with sweeps, then scale up
- Version control your
.tomlspecs
9. FAQ
Can I do local CPU training?
Yes, but it's slower. Disable GCP logic accordingly.
Where do I set epochs?
In sweep.epochs_per_sweep or with a custom training param.
Can I run multiple models from one spec?
Not directly—create multiple spec files for different models.
Is there a debug mode?
Use --enable_cache and a small dataset for quick tests.
10. Next Steps
- Try a minimal example with small data
- Scale up to GCP jobs with real datasets
- Integrate the exported model into a filter or runtime pipeline
Conclusion
Protege gives you a powerful, TOML-driven pipeline for training computer vision models in the cloud. Define, train, monitor, and export—all from one spec. With proper dataset hygiene, GCP setup, and W&B integration, you’ll be able to produce reproducible models that plug straight into your inference pipeline or filter stack.
Need advanced help? Explore the model_runtime repo, ask internally, or dive into the full documentation for deeper customization!